Pages

Friday, August 28, 2009

Advertising Walk of Fame: Vote for your Favorite


Click the link below to vote for you favorite icon and slogan!
http://advertisingweek.com/content.php?cid=fame


Visit: mypaperbird.blogspot.com

Tutorial:Photoshop:Create a Wooden Text


Here is a tutorial for creating a cool Wooden Text Effect.
Click the link below or the Post title to read it.


1. Open Photoshop and create a new document with the dimensions,1280*800 Pixels.

2. Fill it up with a radial gradient. See the image below


3. Now type in the text. We are doing this letter by letter.So type in the first letter.Goto layer effects.Apply a shadow and a stroke.See the image below


4.Similarly type in the other letters and arrange them as you wish.


5.Now bring in the wood texture.

6.Place it under the text.Now using the Magic wand tool,select the white space inside the text.Click on the Wood Texture layer.Goto Layer>New>Layer via cut.


7.Now place the new cut layer on top of the text layer.Repeat this on all the Letters.

8.To add a little more realism,bring in a screw image and place it over the texts,with a shadow effect applied on to them. See the image below.


9.Add a couple of flourishes and a foliage below the text.


10.Now we need a realistic light effect on the text.To do that. Flatten the text layers with the texture on it.Duplicate the layer.Using the curves,bring up the lightness of the top layer.Now with the eraser selected,remove the bottom portion of the top layer.See the image below


11.Add a vignette[to do so,fill a new layer with black and use eraser to remove the central portion]. You now have the final image!


Visit: mypaperbird.blogspot.com

Thursday, August 27, 2009

Kanthasamy: On a screen near you


Watch the Song Online: (Low Res)

Back Again!

Hey Guys,

It has been a very busy period .Tough fever season again! But we are back and a whole lot of exciting stuff are lined up. Two movies that we worked on, are all set to be theatrically released.We are also going international this quarter! Already talks are happening for doing CG works with Caryn Mandabach Productions,the creators of Nurse Jackie.Also you guys Keep visiting the blog for updates,multimedia tips and many more fresh tutorials.Last but definitely not the least,I want to thank you guys for all your support so far! You Rock!

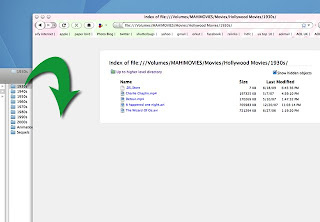
Hey, Need a quick tip? I was working on something on my mac and this accidentally came up. Pretty useful. Ever wanted to create an index from a folder? Here's an easy way.
Drag the folder on to an open browser window.You will get the index of the folder contents on the web page.Now you can go to file> save it as a web page or a text file. Cool,isn't?


Visit: mypaperbird.blogspot.com

Thursday, August 20, 2009

Glossary

A list of commonly used multimedia Jargons and Useful Links.This thread will be continuously updated.You can find this topic later by clicking the Glossary Link on the left Menu Panel.

Continue Reading...

1.Thomas Luft's Ivy Generator
http://graphics.uni-konstanz.de/~luft/ivy_generator/
http://guruware.at/main/ivy/index.html
http://mypaperbird.blogspot.com/2008/10/wallpaper-poison-ivy-1920x1200.html
http://mypaperbird.blogspot.com/2008/10/digital-art-ruins-2-mock-poster.html

2.Ambient Occlusion
http://en.wikipedia.org/wiki/Ambient_occlusion
http://mypaperbird.blogspot.com/2008/10/digital-art-ruins-2-mock-poster.html

3.Z-Depth
http://mypaperbird.blogspot.com/2008/12/tutorial-3d-maxphotoshop-zdepth-of.html

4.HDR [High Dynamic Range]
http://en.wikipedia.org/wiki/High_dynamic_range_imaging
http://mypaperbird.blogspot.com/2008/08/whats-hdr.html
http://mypaperbird.blogspot.com/2009/05/manual-hdri.html

5.Mudbox
http://usa.autodesk.com/adsk/servlet/pc/index?id=13565063&siteID=123112

6.Wirefusion
http://www.demicron.com/wirefusion/

7.Fume FX
http://www.ideateinc.com/products/multimedia/plugins/fumefx.html

8.Real Flow
http://www.realflow.com/n_what.htm

9.V Ray
http://www.chaosgroup.com/en/2/vray.html
http://cg-india.com/Tutorials/V-Ray/3dsMax_tutorial_SL_01.html

10.Mocha
http://www.imagineersystems.com/products/mocha_for_After_Effects/

11.Wiggler
Creates digital jarred/smooth vibrations to your virtual camera in AfterEffects.
Define a 'start & end' keyframe set and apply the wiggler with the keyframes selected.


Visit: mypaperbird.blogspot.com

Friday, August 7, 2009

Tutorial:Photoshop:CG Post Production using Photoshop


The VFX breakdown of creating this image.
Click to read the full post...

I used 3D Studio Max to build up the basic models.I am not going into those details at this moment,lets focus on post-prod.After setting up the scene,i rendered out two verions of the image.One with a skylight [to get the shadows realistic] and one with two point/omni lights [to get the reflections and glossiness].Saved both as JPGs.


Now entering the post-prod zone.In photoshop opened up the two files and layered it up in one document.Placed the skylight version on top and using an eraser,carefully removed unwanted areas from the skylight image to bring up the reflections and glossiness from the bottom image.


I did add the label on the container in photoshop.Created a white rectangle and using the warp tool,modified the edges to fit it to the cylindrical container.


Typed in the text in the label.I used a handwriting font to make it look more authentic.Used the eraser on the edges of the label to merge them seemlessly to the cylinder.


Played with the curves to make the image a bit more darker and did add a vignette on the top.


Now to make that 'confusion' effect on the image.I duplicated the layer 2 times,changed the opacity to a lower level and slightly changed the offset of the top layers.


I wanted a more realistic feel to the final output,so brought down the saturation to about a 25%.


Visit: mypaperbird.blogspot.com